 Lila, my eight year old daughter, has kind of a silly personality. She's been interested in this game called Bakugan recently (she keeps her battle cards in a little pink zip-up purse that reads "Kiss" on one side as I'm sure all Bakugan battle cards are kept!) so I decided to make her a little game board for her to play on. I'm hoping she gets a kick out of this!
Friday, May 29, 2009
Lila's Bakugan Battle Game Board
Lila, my eight year old daughter, has kind of a silly personality. She's been interested in this game called Bakugan recently (she keeps her battle cards in a little pink zip-up purse that reads "Kiss" on one side as I'm sure all Bakugan battle cards are kept!) so I decided to make her a little game board for her to play on. I'm hoping she gets a kick out of this!
Friday, May 22, 2009
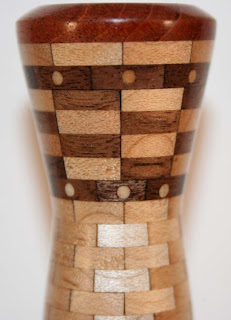
Wine Bottle Stopper # 13
I was inspired a few weeks back to try something new with my segmented bottle stoppers by this project. I made a jig for my drillpress to hold my individual segments so I could drill a little hole and insert a small dowel (also known as a toothpick!).
Stopper Stats:
Total pieces: 137
Primary wood: Red Leaf Maple
Secondary wood: Walnut
Cap: Sapele
Dimensions: 2-1/8” tall, 1” diameter
Finish: CA/BLO
Total pieces: 137
Primary wood: Red Leaf Maple
Secondary wood: Walnut
Cap: Sapele
Dimensions: 2-1/8” tall, 1” diameter
Finish: CA/BLO

serial # 2009-013
a close-up to show more detail.

Friday, April 24, 2009
Be Careful with CA Glue!
I've been working the past couple of days on getting more stopper tops through the final glue stage so I can turn them on the lathe. Most wood glues that I use in furniture (titebond II typically) takes a couple hours to cure before being ready to continue working with the piece. I can't use this type of glue while working on the bottle stoppers or else I'd still be working on the first one! I use Cyanoacrylate... typically referred to as CA. It's basically like super glue and it bonds within seconds.
While working last Wednesday night, I had this short, but very real fear that I'd glued my thumbs together! I went to set down the piece I had just glued up and my thumbs were stuck together. I breifly pictured how it would go down if I had to go upstairs and wake up my wife for help (I pictured a lot of laughing). Not wanting to have to make that journey, I was able to pull my thumbs apart. Thankfully it was just a drop of CA and I didn't have to tear any skin in the seperation process.
It's not just tools with blades that require respect and careful use!
While working last Wednesday night, I had this short, but very real fear that I'd glued my thumbs together! I went to set down the piece I had just glued up and my thumbs were stuck together. I breifly pictured how it would go down if I had to go upstairs and wake up my wife for help (I pictured a lot of laughing). Not wanting to have to make that journey, I was able to pull my thumbs apart. Thankfully it was just a drop of CA and I didn't have to tear any skin in the seperation process.
It's not just tools with blades that require respect and careful use!
Thursday, April 16, 2009
Etsy& My Online Store
I have signed up at Etsy and created my own store!
My store name is darrylmasterson (darrylmasterson.etsy.com)
what is Etsy?
Etsy is: Your place to buy & sell all things handmade.
I've created to store to provide the ability to sell the bottle stoppers I've been making. I have sold my first! The postings from yesterday (stoppers 9, 10, 11 & 12) have not yet been posted to my Esty store, but I should be getting to that shortly.
So stop on by and take a look around at what I've set-up!
My store name is darrylmasterson (darrylmasterson.etsy.com)
what is Etsy?
Etsy is: Your place to buy & sell all things handmade.
I've created to store to provide the ability to sell the bottle stoppers I've been making. I have sold my first! The postings from yesterday (stoppers 9, 10, 11 & 12) have not yet been posted to my Esty store, but I should be getting to that shortly.
So stop on by and take a look around at what I've set-up!
Wednesday, April 15, 2009
Stoppers #s 9, 10, 11 & 12
I've got several stoppers in different phases of the gluing process and I've also finished a few more.
Here's another parallel twist stopper:
Total pieces: 121
Primary wood: Jatoba (Brazilian Cherry)
Secondary wood: Red Leaf Maple
Cap: Sapele
Dimensions: 2-1/8” tall, 1” diameter
Finish: CA/BLO

serial # 2009-009
To purchase this stopper through my Etsy store, click here.
A Parallel twist plus:
Total pieces: 121
Primary wood: Walnut
Secondary wood: Red Leaf Maple
Tertiary wood: Jatoba (Brazilian Cherry)
Cap: Sapele
Dimensions: 2-1/8” tall, 1” diameter
Finish: CA/BLO

serial # 2009-010
To purchase this stopper through my Etsy store, click here.
A Speckled stopper:
Total pieces: 121
Primary wood: Red Leaf Maple
Secondary wood: Jatoba (Brazilian Cherry)
Cap: Sapele
Dimensions: 2-1/8” tall, 1” diameter
Finish: CA/BLO

serial # 2009-011
To purchase this stopper through my Etsy store, click here.
A Random selection stopper:
Total pieces: 121
Primary wood: Cherry
Secondary wood: Jatoba (Brazilian Cherry)
Tertiary wood: Red Leaf Maple
Quaternary wood: Walnut
Cap: Sapele
Dimensions: 2-1/8” tall, 1” diameter
Finish: CA/BLO

serial # 2009-012
To answer a couple questions you are probably asking yourselves right now:
Here's another parallel twist stopper:
Total pieces: 121
Primary wood: Jatoba (Brazilian Cherry)
Secondary wood: Red Leaf Maple
Cap: Sapele
Dimensions: 2-1/8” tall, 1” diameter
Finish: CA/BLO

serial # 2009-009
To purchase this stopper through my Etsy store, click here.
A Parallel twist plus:
Total pieces: 121
Primary wood: Walnut
Secondary wood: Red Leaf Maple
Tertiary wood: Jatoba (Brazilian Cherry)
Cap: Sapele
Dimensions: 2-1/8” tall, 1” diameter
Finish: CA/BLO

serial # 2009-010
To purchase this stopper through my Etsy store, click here.
A Speckled stopper:
Total pieces: 121
Primary wood: Red Leaf Maple
Secondary wood: Jatoba (Brazilian Cherry)
Cap: Sapele
Dimensions: 2-1/8” tall, 1” diameter
Finish: CA/BLO

serial # 2009-011
To purchase this stopper through my Etsy store, click here.
A Random selection stopper:
Total pieces: 121
Primary wood: Cherry
Secondary wood: Jatoba (Brazilian Cherry)
Tertiary wood: Red Leaf Maple
Quaternary wood: Walnut
Cap: Sapele
Dimensions: 2-1/8” tall, 1” diameter
Finish: CA/BLO

serial # 2009-012
To answer a couple questions you are probably asking yourselves right now:
- Yes, I did have to do a google search to find out what comes after "secondary".
- No, the Random stopper is not just a bunch of left over bits. My sister had suggested to me a while ago to make a random stopper. I'm glad I listened!
Sunday, April 05, 2009
wine bottle stoppers
I worked a little on the adirondacks today, but the day was primarily about wine bottle stoppers. I finished three (well four actually, but I only have pictures of three!):
#5
Stopper Stats:
Total pieces: 121
Primary wood: Red Leaf Maple
Secondary wood: Jatoba (Brazilian Cherry)
Cap: Sapele
Dimensions: 2-1/8” tall, 1” diameter
Finish: CA/BLO

#6
Stopper Stats:
Total pieces: 121
Primary wood: Walnut
Secondary wood: Red Leaf Maple
Cap: Sapele
Dimensions: 2-1/8” tall, 1” diameter
Finish: CA/BLO

#7
Stopper Stats:
Total pieces: 121
Primary woods: Jatoba (Brazilian Cherry) & Walnut
Cap: Sapele
Dimensions: 2-1/8” tall, 1” diameter
Finish: CA/BLO

I also setup my Etsy store today!
Well that caps my five days away from the real job... heading back to the office tomorrow morning. Thanks for following along the past few days, I hope it was as fun for you as it was for me!
#5
Stopper Stats:
Total pieces: 121
Primary wood: Red Leaf Maple
Secondary wood: Jatoba (Brazilian Cherry)
Cap: Sapele
Dimensions: 2-1/8” tall, 1” diameter
Finish: CA/BLO

#6
Stopper Stats:
Total pieces: 121
Primary wood: Walnut
Secondary wood: Red Leaf Maple
Cap: Sapele
Dimensions: 2-1/8” tall, 1” diameter
Finish: CA/BLO

#7
Stopper Stats:
Total pieces: 121
Primary woods: Jatoba (Brazilian Cherry) & Walnut
Cap: Sapele
Dimensions: 2-1/8” tall, 1” diameter
Finish: CA/BLO

I also setup my Etsy store today!
Well that caps my five days away from the real job... heading back to the office tomorrow morning. Thanks for following along the past few days, I hope it was as fun for you as it was for me!
Production & a Break
Yesterday I finished attaching the seat slats to two of the adirondacks. All that's left on this pair is to attach the arms.
I also finished another bottle stopper:

I call this the "Argyle Sock", here are the stats:
Total pieces: 121
Primary wood: Jatoba (Brazilian Cherry) & Walnut
Secondary wood: Red Leaf Maple
Cap: Sapele
Dimensions: 2-1/8” tall, 1” diameter
Finish: CA/BLO
To end the day, a couple of friends came over and we played several rounds of Mille Borne. It's a fun card game.
Saturday, April 04, 2009
New Stopper & Adirondack Backs
I spent most of the day working on the Adirondacks. I got the visible screws plugged & then started working on the backs. I have two of the four Adirondack backs assembled and installed. Tomorrow I should be able to apply the seat slats to the two chairs that have backs. I need to apply a coat of shellac to the two other frames to prep them for paint (the last two chairs I will be painting!).
I wanted to get at least one stopper completed before ending the day, so here's stopper #3.

Stopper Stats:
Total pieces: 121
Primary wood: Jatoba (Brazilian Cherry)
Secondary wood: Red Leaf Maple
Cap: Sapele
Dimensions: 2-1/8” tall, 1” diameter (approx.)
Finish: CA/BLO

Thursday, April 02, 2009
Adirondack Frames
In day two of my three days in the shop:
I did the final glue up on two more bottle stopper blanks. This puts me to a total of eleven needing to be turned. And of course I need about another dozen to fill the current requests (not a bad thing!).
I also continued working on the four Adirondacks. All four now have completed frames. Tomorrow I hope to make some good progress on completing and installing the backs. I tell ya though, adding four Adirondack frames to an already cramped workspace makes things a little tight!
I did the final glue up on two more bottle stopper blanks. This puts me to a total of eleven needing to be turned. And of course I need about another dozen to fill the current requests (not a bad thing!).
I also continued working on the four Adirondacks. All four now have completed frames. Tomorrow I hope to make some good progress on completing and installing the backs. I tell ya though, adding four Adirondack frames to an already cramped workspace makes things a little tight!
Wednesday, April 01, 2009
Working Outside
I've often thought of how nice it would be to break out of the dungeon and have a 1st floor workshop. Wouldn't it be great to open the doors and enjoy the outdoors and woodworking at the same time?
Since it wasn't raining today (and I'm not a fan of cleaning the shop!) I dragged the planer outside to finish prepping stock to cut a sickening number of segments to build more bottle stoppers and pens. Oh, did I mention that it was about 37 degrees today?! It did get up into the 40's but it also rained this afternoon. It was nice to be outdoors though!
Other than prepping that stock for stoppers, I assembled the front legs of four adirondacks and did the final glue up on three bottle stoppers today.
Since it wasn't raining today (and I'm not a fan of cleaning the shop!) I dragged the planer outside to finish prepping stock to cut a sickening number of segments to build more bottle stoppers and pens. Oh, did I mention that it was about 37 degrees today?! It did get up into the 40's but it also rained this afternoon. It was nice to be outdoors though!
Other than prepping that stock for stoppers, I assembled the front legs of four adirondacks and did the final glue up on three bottle stoppers today.
Tuesday, March 31, 2009
Anticipated Updates
In desperate need for a few days away from the real job, I'm taking the next three days off.
...well sort of!
I have 4 Adirondack chairs to work on, along with about two dozen bottle stoppers!
Stay tuned for updated stories, postings and pictures!
...well sort of!
I have 4 Adirondack chairs to work on, along with about two dozen bottle stoppers!
Stay tuned for updated stories, postings and pictures!
Monday, March 30, 2009
Segmented Bottle Stopper #2
Here is my second completed wine bottle stopper.

I’m fairly happy about how this stopper came out. There are still a few tweaks I’d like to make to the process to improve the results.

I’m fairly happy about how this stopper came out. There are still a few tweaks I’d like to make to the process to improve the results.

Stopper Stats:
Total pieces: 121
Primary wood: Walnut
Secondary wood: Red Leaf Maple
Cap: Sapele
Dimensions: 2-1/8” tall, 1” diameter
Finish: CA/BLO
Tuesday, March 17, 2009
First Wine Bottle Stopper
I bought my bottle stopper kits about a year and a half ago. I had made this blank to be part of another segmented pen, but got to thinking that it was just about the right size to make a stopper also.

There are about 120 +/- pieces of walnut, maple, bloodwood and sapele in this piece. I used the same CA/BLO finish on the topper that I use on my pens. The stopper top is about 2-1/4” tall.


Monday, February 16, 2009
darrylmasterson.com
I updated my website again: darrylmasterson.com
I'm trying to work on a simple design to showcase each piece and allow (if somwhere way down the line) to sell pieces without yet again another redesign. It's close to what I have in mind, but I don't think it's quite there yet.
I'd like to work on my images. I think if there was a more consistant picture quality it would help even everything out.
I also need to work on my item descriptions, a marketing guru I am not!
I'm trying to work on a simple design to showcase each piece and allow (if somwhere way down the line) to sell pieces without yet again another redesign. It's close to what I have in mind, but I don't think it's quite there yet.
I'd like to work on my images. I think if there was a more consistant picture quality it would help even everything out.
I also need to work on my item descriptions, a marketing guru I am not!
Monday, February 02, 2009
First Project of 2009
I've completed my first project of 2009!

My 14 year old daughter asked me to build her a DVD shelf for her bedroom. I liked the look of the DVD shelf I made for my living room a while back and wanted to make something similar. There isn't enough room on her wall for a horizontal shelf so I adjusted the design and made a vertical shelf.
I had a heck of a time installing the horizontal shelf in the living room, so I decided this time around I would design a built in French-Cleat system to make installation easier. I based this feature on the construction of the nesting boxes I made a couple months back with my younger daughters. By adding the French-Cleat at the time of the initial design, I could make the shelf sit flush against the wall and still not make the unit too bulky.

The shelf is built of Pine. For a finish I used the Minwax stain "Early American" before applying a BLO (Boiled Linseed Oil) and paste wax. This is the first project that I've used a stopped dado for the shelf supports. I do prefer this look and will probably use it more often now.
For a "cool-factor", this unit also has a hidden drawer! Initally I was calling it a secret drawer, but it's not so much a secret anymore...

I'm pretty happy with the outcome of this project, which is a good thing too since my eight year old now wants me to build one for her room.
Monday, October 27, 2008
Project with the Kids - Nesting Boxes
My two younger daughters, ages 7 and 4, are always interested in working with me in the shop. I thought it might be fun to make a couple of birdhouses with them. After looking around on the internet a little bit to learn what size and style to go with, I settled on a style called nesting boxes. From what I understand, a nesting box is design more for the actual birds needs rather than going with a traditional “house” type design that is typically made.
Click here for one of the websites I used in putting this project together.
Once I got my ideas all together, I started working on cutting the pieces needed to make a couple of nesting boxes. Having quite a bit of that baltic birch ply still available, that is what I used. I also figured the girls would want to paint the nesting boxes when they were done, so I wasn’t overly concerned on the longevity of the ply.
After I had all the pieces cut, I laid out and drilled the nail holes and the bird entrance. Considering that I got the wood for free and already had the nails, I really didn’t want to have to go out and by hinges for this project. I decided that it could be cool, and much more LumberJock like to have a French Cleat system to hold the house to the backing board. Then it was time to introduce the girls!
I had already walked myself through the assembly order, so it went fairly smoothly getting the girls to follow along. We attached the sides to the bottom and the houses side of the French Cleat. Then using the house as a guide, the girls attached the mating cleat to the backing board. The top was added next followed by the front.

The two bird nesting boxes I made with my daughters

A view of the French Cleat system used to access the nesting box for cleaning
The girls both seemed really happy with their houses. Now it’s time to paint and put them in the wild!

Here’s Violet holding her nesting box.
Click here for one of the websites I used in putting this project together.
Once I got my ideas all together, I started working on cutting the pieces needed to make a couple of nesting boxes. Having quite a bit of that baltic birch ply still available, that is what I used. I also figured the girls would want to paint the nesting boxes when they were done, so I wasn’t overly concerned on the longevity of the ply.
After I had all the pieces cut, I laid out and drilled the nail holes and the bird entrance. Considering that I got the wood for free and already had the nails, I really didn’t want to have to go out and by hinges for this project. I decided that it could be cool, and much more LumberJock like to have a French Cleat system to hold the house to the backing board. Then it was time to introduce the girls!
I had already walked myself through the assembly order, so it went fairly smoothly getting the girls to follow along. We attached the sides to the bottom and the houses side of the French Cleat. Then using the house as a guide, the girls attached the mating cleat to the backing board. The top was added next followed by the front.

The two bird nesting boxes I made with my daughters

A view of the French Cleat system used to access the nesting box for cleaning
The girls both seemed really happy with their houses. Now it’s time to paint and put them in the wild!

Here’s Violet holding her nesting box.

And Lila with her's.

Here are the two girls together.
Tuesday, October 14, 2008
Dungeon Happenings
I know that based on the numbers of posts rolling through this blog lately you would be hard pressed to think anything was happening at all in my little dungeon of a workshop... and you'd actually be wrong!
I actually do have a few projects in the works!
~ I have a couple of pens that I need to get finished. They really should have been done a long time ago, but sadly they kept getting stuck on the backburner.
~ I have another set of Adirondack chairs to do. This set is going to be painted white. They are for one of the girls at work that has already purchased two others. She also wants a couple more foot rests to go with them. The foot rests aren't quite as far along as the chairs though...
~ I have another small table in the works also. Similar in size to the table I made for my daughter, this one is being made with some oak that once was a hand rail in a local college.
~ I also have that dresser from oh so long ago that I would like to make some progress on. In a way, I'm actually glad that project got halted. I've found a few ways to overcome some perceived obstacles in that project that I feel fairly confident in tackling now.
So if I can stay focused and busy, I might actually have some interesting posts coming up soon. It would be nice to end the year with a barrage of completed projects and postings!
I actually do have a few projects in the works!
~ I have a couple of pens that I need to get finished. They really should have been done a long time ago, but sadly they kept getting stuck on the backburner.
~ I have another set of Adirondack chairs to do. This set is going to be painted white. They are for one of the girls at work that has already purchased two others. She also wants a couple more foot rests to go with them. The foot rests aren't quite as far along as the chairs though...
~ I have another small table in the works also. Similar in size to the table I made for my daughter, this one is being made with some oak that once was a hand rail in a local college.
~ I also have that dresser from oh so long ago that I would like to make some progress on. In a way, I'm actually glad that project got halted. I've found a few ways to overcome some perceived obstacles in that project that I feel fairly confident in tackling now.
So if I can stay focused and busy, I might actually have some interesting posts coming up soon. It would be nice to end the year with a barrage of completed projects and postings!
Thursday, October 09, 2008
Prototypes - Scallops
I have seen other penmakers use this scallop techinique and thought I would give it a try. To start out I wanted to get an idea of what size I need to use initially to know what to expect when the blank is turned down. So far I like how everything is looking. I want to try incorporating this and a couple other segmenting techniques I used to come up with something a little crazier than I’ve done previously.


I’ve got several long weekends coming up so hopefully I should have some time to play around in the shop.
Monday, September 29, 2008
PTA Sandwich Board
The other day my wife brought home the PTA's (Parent / Teacher Association) sandwich board and asked me if I could fix it up. This sorry excuse for a woodworking project consisted of two 36"x48" pieces of 1/2" ply connected via a couple of hinges and small chains.
I decided that if I'm going to work on this, I'm going to do it up right!
I built a new frame using some baltic birch plywood that I've had lying around. The top and bottom supports have rabbets cut into them to support the new removable 1/4" ply pieces that will hold the sandwich board content. I did re-use the hinges and chains from the original board.
I decided that if I'm going to work on this, I'm going to do it up right!
I built a new frame using some baltic birch plywood that I've had lying around. The top and bottom supports have rabbets cut into them to support the new removable 1/4" ply pieces that will hold the sandwich board content. I did re-use the hinges and chains from the original board.

The new board, while stable, is lighter and much more manageable than the original.
Monday, August 18, 2008
A New Door has been Discovered!
Apparently my daughters have been so nice to the fairies that moved in, the fairies have invited their friends to move in as well!

A new door has been discovered. And a note has been left at the first door that reads:“Thank you for the gift. You have been so nice to us, we have invited our friends to move in as well.”
Apparently the fairies in the new fairy door prefer a room with a view as this door is located a few steps up from the original.

It looks like this door is constructed of Jatoba with a Cherry frame and finished with Boiled Linseed Oil.

A new door has been discovered. And a note has been left at the first door that reads:“Thank you for the gift. You have been so nice to us, we have invited our friends to move in as well.”
Apparently the fairies in the new fairy door prefer a room with a view as this door is located a few steps up from the original.

It looks like this door is constructed of Jatoba with a Cherry frame and finished with Boiled Linseed Oil.
Subscribe to:
Posts (Atom)